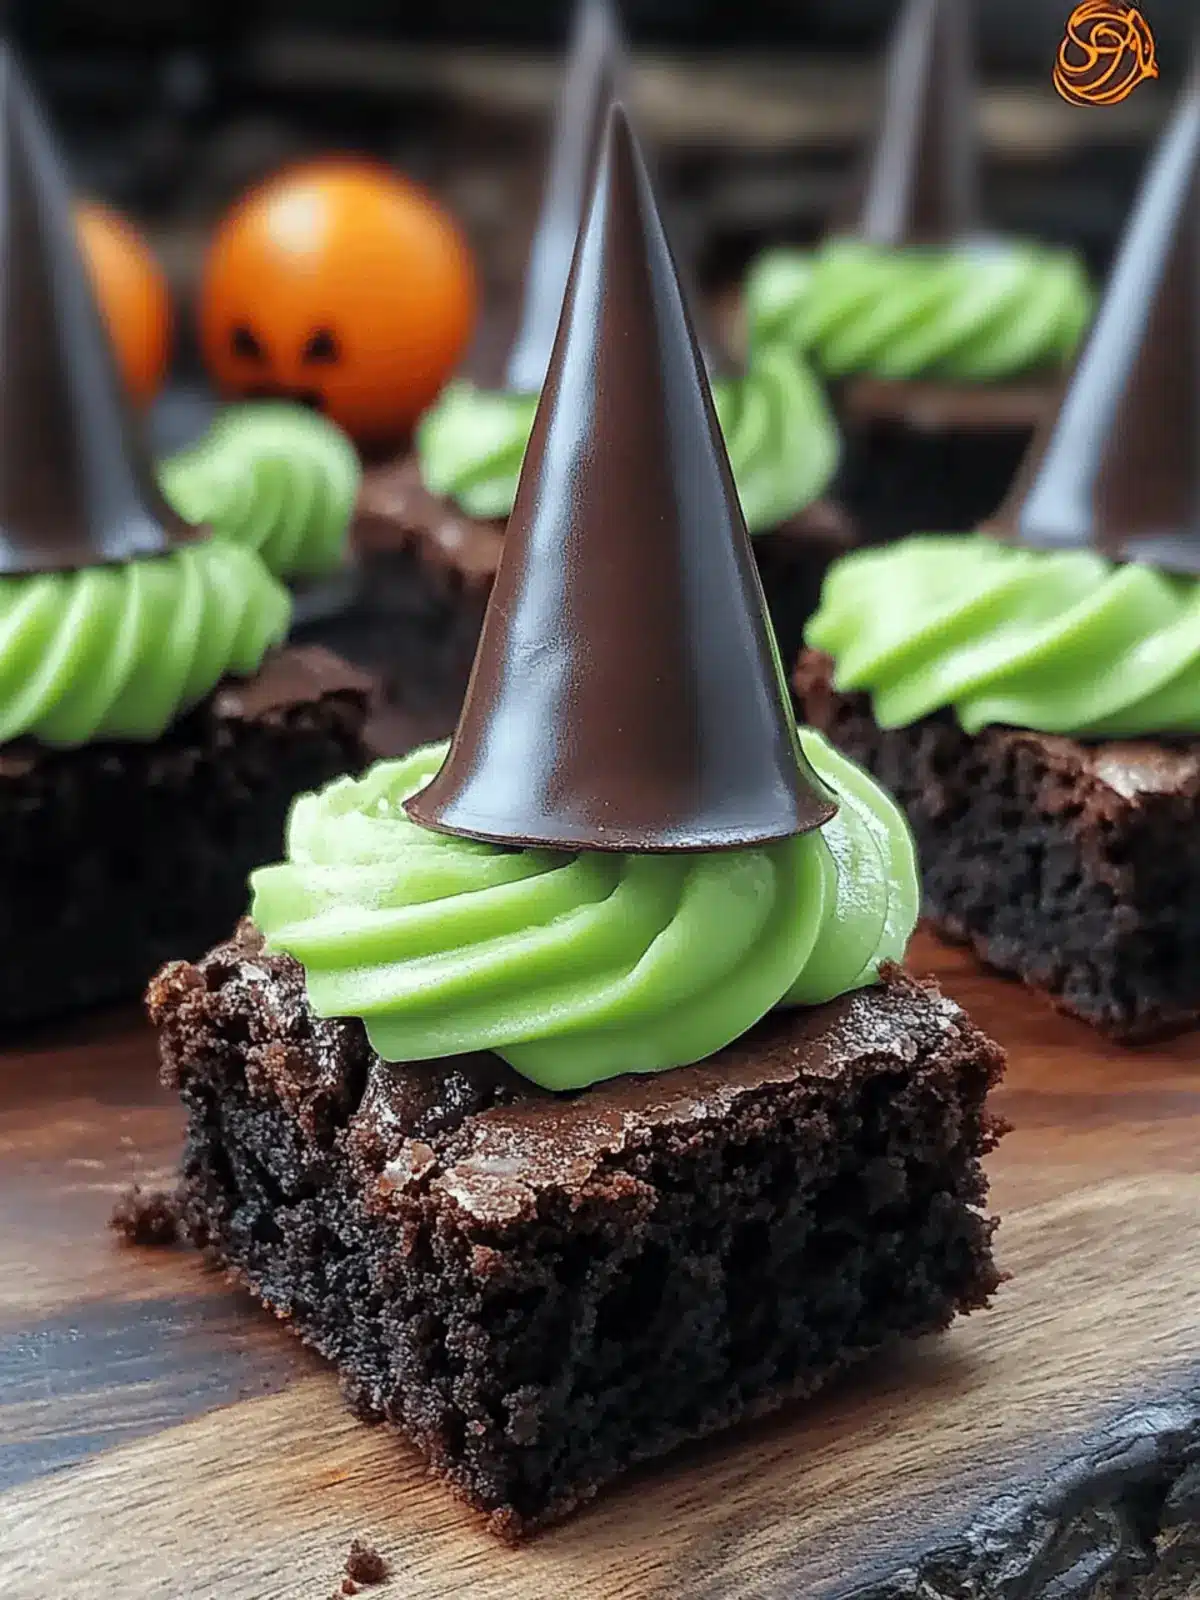
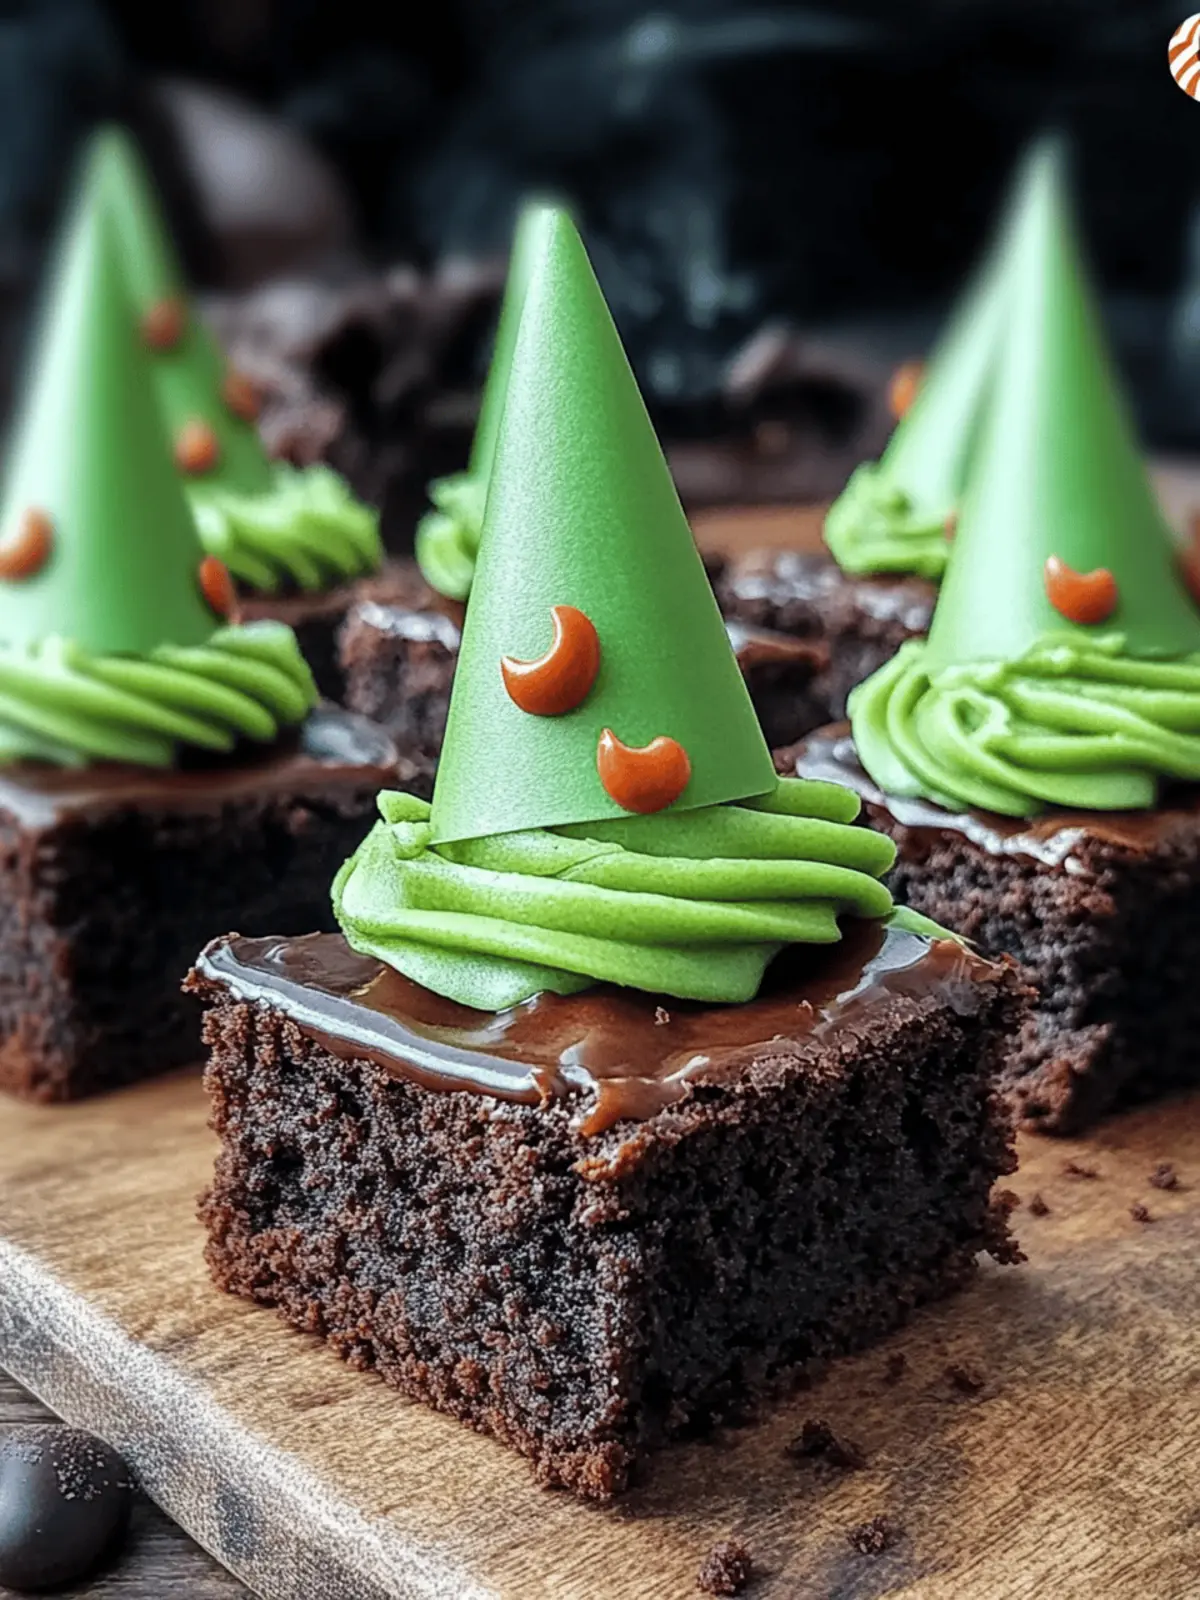
As the chill of autumn settles in and colorful leaves swirl in the breeze, I can’t help but crave the nostalgia of Halloween treats. The moment I spotted a stash of chocolate ice cream cones peeking from the back of my pantry, inspiration struck! What better way to celebrate this spooky season than by transforming simple brownies into delightful Wicked Witch Hat Brownies?
These fun, fudgy delights feature an upside-down ice cream cone, artfully decorated to resemble a witch’s hat, all drizzled with vibrant green frosting and festive sprinkles. Every bite combines a rich chocolatey flavor with a whimsical touch that’s sure to enchant both kids and adults alike. And don’t worry—whether you’re gluten-free or vegan, I’ve got you covered with easy variations. So gather your favorite ghouls and get ready to create some magic in the kitchen with these show-stopping treats!

Why Are Wicked Witch Hat Brownies So Magical?
Delightful Presentation: The combination of ice cream cones and vibrant frosting creates a visually stunning treat that steals the show at any Halloween gathering.
Rich Chocolate Flavor: These brownies boast a fudgy base packed with chocolate goodness, making them a crowd-pleaser for all ages.
Versatile Options: With simple swaps, you can easily make gluten-free or vegan versions, ensuring everyone can enjoy a spooky bite.
Quick and Easy: The process is straightforward and requires minimal ingredients, making it perfect for last-minute festivities.
Perfect for Sharing: Whether it’s at a family party or school event, these charming brownies are guaranteed to be a hit, bringing joy to every celebration.
Wicked Witch Hat Brownies Ingredients
For the Brownies
• Unsalted Butter – Provides richness and moisture; substitute with margarine for a dairy-free option.
• Granulated Sugar – Sweetens the brownies and contributes to texture; no direct substitute recommended.
• Large Eggs – Binds the ingredients and helps with leavening; use flax eggs or applesauce for a vegan option.
• Vanilla Extract – Adds aromatic depth; no direct substitute, but omit if unavailable.
• All-Purpose Flour – Gives structure to the brownies; substitute with a gluten-free flour blend for gluten-free brownies.
• Unsweetened Cocoa Powder – Provides the rich chocolate flavor; Dutch-process cocoa can be used for a deeper flavor.
• Salt – Enhances sweetness and balances flavor; can be omitted if using salted butter.
• Baking Powder – Helps brownies rise slightly; no substitute recommended.
For the Topping
• Chocolate Ice Cream Cones – Used for decoration resembling witch hats; no substitute; can skip for a simpler design.
• Powdered Sugar – Sweetens and thickens the frosting; cornstarch can be added if desired.
• Milk – Creates a smooth frosting; substitute with almond milk or any non-dairy milk for a vegan version.
• Green Food Coloring – Used to color the frosting; omit for a simpler frosting or use natural coloring.
• Halloween-Themed Sprinkles – Adds fun decoration; any sprinkles can be used, ensuring your Wicked Witch Hat Brownies are a spooky visual treat!
How to Make Wicked Witch Hat Brownies
-
Melt Butter: Start by melting the unsalted butter in a medium saucepan over low heat. Once melted, remove from heat and stir in the granulated sugar until well combined.
-
Add Eggs and Vanilla: Mix in the large eggs, one at a time, stirring between each addition. Add the vanilla extract, making sure everything is thoroughly blended.
-
Whisk Dry Ingredients: In a separate bowl, whisk together the all-purpose flour, unsweetened cocoa powder, salt, and baking powder until evenly combined.
-
Combine Mixtures: Gradually add the dry ingredients to the wet ingredients, mixing just until no flour streaks remain. Avoid overmixing to keep the brownies fudgy.
-
Bake: Pour the brownie batter into a greased 9×13 inch baking pan. Bake in a preheated oven at 350°F (175°C) for 25-30 minutes. A toothpick should come out with moist crumbs when done.
-
Cool Brownies: Allow the brownies to cool completely in the pan on a wire rack, which helps them set and makes frosting easier.
-
Prepare the Topping: If desired, dip the tops of the chocolate ice cream cones in melted chocolate and cover with Halloween-themed sprinkles to look like witch hats.
-
Make the Frosting: In a medium bowl, mix the powdered sugar, milk, vanilla, and green food coloring until smooth and creamy. Spread the frosting evenly over the cooled brownies.
-
Assemble the Treats: Place an upside-down ice cream cone on each frosted brownie, adding more sprinkles for a festive touch!
Optional: Add a dash of edible glitter for an extra magical touch!
Exact quantities are listed in the recipe card below.
Wicked Witch Hat Brownies Variations
Customize this wickedly delightful recipe to suit your taste and dietary needs without losing any of the spooktacular charm!
-
Gluten-Free: Substitute all-purpose flour with a gluten-free blend that includes xanthan gum for structure and texture. Enjoy the same rich flavor with a worry-free twist!
-
Vegan: Replace the large eggs with flax eggs (1 tbsp ground flaxseed mixed with 2.5 tbsp water for each egg) and use almond or oat milk in the frosting for a luscious, dairy-free option.
-
Nutty Boost: Introduce a nutty flavor by adding chopped walnuts or pecans to the brownie batter. The crunch enhances every fudgy bite.
-
Mint Chocolate: Incorporate a few drops of mint extract into the frosting for a refreshing minty twist that pairs beautifully with chocolate. It’s like a spooky garden of flavor!
-
Spicy Treat: Add a pinch of cayenne pepper to the brownie batter for a surprising kick that balances the sweetness. This twist is perfect for those who enjoy a little heat!
-
Dark Chocolate: Use dark chocolate cocoa powder in place of the unsweetened version for a richer and more decadent brownie experience. It’ll send your taste buds dancing!
-
Fruit-Filled: Fold in mini chocolate chips or chopped up dried cherries into the brownie batter to create pockets of fruity sweetness in every bite.
-
Healthy Twist: Try using unsweetened applesauce instead of butter for a lower-fat version. The brownies will still be moist and delicious, perfect for guilt-free indulgence!
Storage Tips for Wicked Witch Hat Brownies
Room Temperature: Store brownies in an airtight container at room temperature for up to 5 days to maintain their fudgy texture and flavor.
Fridge: If you prefer chilled brownies, refrigerate them for up to 7 days. Just make sure they are well wrapped to prevent drying out.
Freezer: For longer storage, freeze the brownies in an airtight container for up to a month. Thaw them in the fridge overnight before serving.
Reheating: If you prefer your brownies warm, microwave individual pieces for 10-15 seconds until just warmed through, making those Wicked Witch Hat Brownies even more luscious!
What to Serve with Wicked Witch Hat Brownies?
When you’re ready to enchant your guests with a full Halloween feast, these charming brownies will be the showstopper of the table.
-
Spooky Milkshakes: Pair with chocolate or green tea milkshakes for a creamy contrast that delights the senses.
-
Pumpkin Spice Cookies: The warm spices in these cookies harmonize beautifully with the rich chocolate flavor of the brownies.
-
Caramel Apples: The sweetness and crunch of caramel-dipped apples add a fun, festive touch that balances the fudgy brownies.
-
Candied Nuts: Crunchy, sweet nuts create a delightful texture contrast and add a nutty flavor that complements the chocolatey treats.
-
Halloween Punch: A fruity punch with gummy worms or floating eyeball ice cubes is a whimsical drink that fits perfectly with your Halloween theme.
-
Chocolate Ganache Tart: For serious chocolate lovers, a rich tart provides an elegant touch when served alongside the playful brownies.
-
Ghostly Meringues: Light, airy meringue cookies shaped like ghosts offer a sweet, airy contrast in texture while keeping the spirit of Halloween alive.
These pairings promise to create a memorable Halloween celebration filled with delightful flavors and fun surprises!
Make Ahead Options
These Wicked Witch Hat Brownies are perfect for meal prep, allowing you to enjoy spooky treats with less stress! You can prepare the brownie batter up to 24 hours in advance—just store it in an airtight container in the refrigerator. Alternatively, bake the brownies ahead of time and keep them in the fridge for up to 3 days; this allows the flavors to meld beautifully. When you’re ready to finish and serve, simply frost them and assemble the witch hats just before your Halloween gathering. This way, you’ll have fabulous treats that are just as delicious while saving precious time on the big day!
Expert Tips for Wicked Witch Hat Brownies
• Cool Before Frosting: Always let your brownies cool completely to avoid melting your frosting. This ensures a beautiful finish on your Wicked Witch Hat Brownies.
• Don’t Overmix: Mix your batter just until combined. Overmixing can lead to dense, cake-like brownies instead of the desired fudgy texture.
• Check Flour Blend: For gluten-free versions, make sure your flour blend contains xanthan gum. This helps maintain the structure of your brownies.
• Use Quality Cocoa: Opt for high-quality unsweetened cocoa powder for richer chocolate flavor. Dutch-process cocoa can also deepen this deliciousness.
• Creative Decorating: Get creative with sprinkles and edible glitter to elevate the visual appeal of your brownies. A little extra decoration goes a long way!
• Storage Tips: Store brownies in an airtight container at room temperature for up to 5 days, or freeze them for longer storage to enjoy later.

Wicked Witch Hat Brownies Recipe FAQs
How do I select the best ingredients for my Wicked Witch Hat Brownies?
Absolutely! For the best flavor and texture in your brownies, opt for high-quality unsalted butter as it adds richness. When choosing eggs, look for fresh ones with clean shells. The all-purpose flour should be stored in a cool, dry place to ensure it remains fresh. For cocoa powder, Dutch-process gives a deeper taste, so consider going that route!
What is the best way to store Wicked Witch Hat Brownies?
These delightful brownies can be stored in an airtight container at room temperature for up to 5 days. If you’d like to enjoy them longer, pop them in the fridge where they will stay fresh for up to a week. Just remember to wrap them well to keep moisture out!
Can I freeze Wicked Witch Hat Brownies? If so, how?
Yes, indeed! To freeze your brownies, make sure they are completely cooled. Cut them into squares and place them in a single layer in an airtight container. You can also wrap each square in plastic wrap for extra protection. They can be frozen for up to 3 months. When you’re ready to enjoy, simply thaw them in the fridge overnight and indulge!
What should I do if my brownies turn out cakey instead of fudgy?
Very! The key to fudgy brownies is to avoid overmixing your batter. Combine the dry and wet ingredients just until no flour streaks remain; this will help maintain that rich, moist texture. Additionally, check your baking time; if they bake for too long, they will dry out. A toothpick should come out with moist crumbs, not clean.
Are there any dietary considerations I need to be aware of when making Wicked Witch Hat Brownies?
Of course! If you’re making these brownies for a group, be mindful of allergies. The traditional recipe contains eggs and dairy, but they can easily be modified for vegans by using flax eggs and almond milk. Also, make sure to choose a gluten-free flour mix with xanthan gum to ensure everyone can join in the fun!
Why did my frosting turn out runny?
If your frosting is too runny, it might be due to too much milk or not enough powdered sugar. Start by gradually adding the milk until you reach the desired consistency. If it’s already too runny, just add more powdered sugar a little at a time until it thickens up nicely!
Wicked Witch Hat Brownies Perfect for Spooky Celebrations
Ingredients
Equipment
Method
- Start by melting the unsalted butter in a medium saucepan over low heat. Once melted, remove from heat and stir in the granulated sugar until well combined.
- Mix in the large eggs, one at a time, stirring between each addition. Add the vanilla extract, making sure everything is thoroughly blended.
- In a separate bowl, whisk together the all-purpose flour, unsweetened cocoa powder, salt, and baking powder until evenly combined.
- Gradually add the dry ingredients to the wet ingredients, mixing just until no flour streaks remain.
- Pour the brownie batter into a greased 9x13 inch baking pan. Bake in a preheated oven at 350°F (175°C) for 25-30 minutes.
- Allow the brownies to cool completely in the pan on a wire rack.
- If desired, dip the tops of the chocolate ice cream cones in melted chocolate and cover with Halloween-themed sprinkles.
- In a medium bowl, mix the powdered sugar, milk, vanilla, and green food coloring until smooth and creamy. Spread the frosting evenly over the cooled brownies.
- Place an upside-down ice cream cone on each frosted brownie, adding more sprinkles for a festive touch!